My guide to (mostly) SLR photography
Part 1/n (where n may be 1): Exposure
I've been wanting to write something like this for a long time. I've had the opportunity to share what I've learnt about the technicalities of SLR photography with a fair few interested people over the last six months or so, and while they seem to leave fairly happy, I know from experience that it takes a while to become confident about whether the bigger numbers mean more light, or less light, or deeper or shallower depth of focus etc, and what's really most effective for each situation. So I thought I'd try and write up a little guide that I can point people to when they're unsure. The answer is that it's very easy, but it does take a while to become somewhat natural.
Note that I still have a long way to improve, but on the technical side I think that I at least understand what's going on, even if I can't always put it into effect as I might like every time. This is also not solely for people with SLRs although some things may sway more towards digital than film, simply because that's what I'm used to. Many point and shoots these days allow good control over the variables that I will be describing here.
This guide is also to be used in addition to the manual of your camera. The controls used in order to change the variables I will talk about here will vary from camera to camera and you'll need to look this up yourself if you don't know already. This should be pretty easy!
The Variables
Essentially in what I'm going to talk about there are three variables to play with. These are: Shutter speed, aperture and ISO, or film sensitivity. Changing these variables will alter in turn, how much motion is stopped or blurred, how deep your depth of field is, and how grainy your photography is (note that all of these can be good or bad, depending on what you're aiming for). In addition they will also affect the amount of light hitting your sensor. The game is to get the correct depth of focus and motion stop or blur, while tuning the variables to get the right exposure. It's a science which is relatively simple, but when you're out there with only a moment to get the shot, it turns into an art.
I won't talk too much about the controls on the camera, which will vary from make to make but there are some things which are relatively general. Many cameras have not only a manual setting, which allows you to change all of these three variables independently, but also an AV and a TV setting which allow you to vary the aperture and the timing respectively, letting the camera work out the optimum conjugate variable. I would advise starting with the AV and TV settings simply because it gives you less to think about and allows you good control in many situations. I'll talk about this more at the end. However, first I'll explain ISO, because this is relatively simple and is needed for all non-automatic settings. You can generally control the ISO whether you're in manual, AV or TV.
ISO in a nutshell
The ISO dictates how much light needs to fall on a given patch of the sensor for it to record a signal. The lower the ISO the less sensitive. However, in order to increase the sensitivity of the sensor (by using higher ISO), it means that the area for each 'grain' of the photo is larger, so that less light needs to be falling on the whole sensor for a given grain to trigger. What this means is that if you want a clearer image, with less grains, then ideally you want a low ISO, and if you want a grainy image you want a high ISO. However, sometimes you have to go to high ISO even if you would really prefer a less grainy image. The reason is that because of the other settings you have chosen, not much light is getting onto the sensor.
Summary:
- Low ISO = lower light sensitivity (often good for bright conditions), and less grainy pictures.
- High ISO = higher light sensitivity (often needed in dark settings), and more grainy pictures.
So, having understand that we have control over the sensitivity through the ISO control we move on to aperture and shutter speed. Each of these alters the amount of light hitting the sensor but also alters the picture in other ways. We'll deal with aperture first:
Aperture
The aperture dictates how wide the diaphragm of the lens is. The smaller the aperture, the less light is getting to the sensor and the larger the aperture, the more light gets in. The other, important effect of aperture is that it changes the depth of field of your photo. A larger aperture will give you a shallow depth of field, whereas a smaller aperture will give you a deep depth of field. Depth of field really means how much of your picture is in focus. In fact it's only possible to get a single distance in perfect focus (without very fancy optics) but how quickly the other distances become more blurred (the falloff in focus) is known as the depth of field. It might initially seem like it would be best to get everything in focus, but in fact for many opportunities this is not the case. Portraits are the perfect example of occasions where you really want only a certain area of the picture in focus.
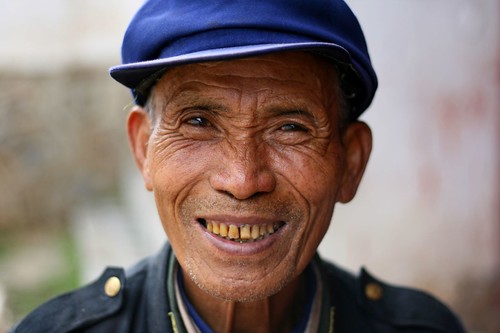
Here is an example of a photo I took in Lijiang. This was taken with a lens with a large maximum aperture (I'll come onto the numbers soon):
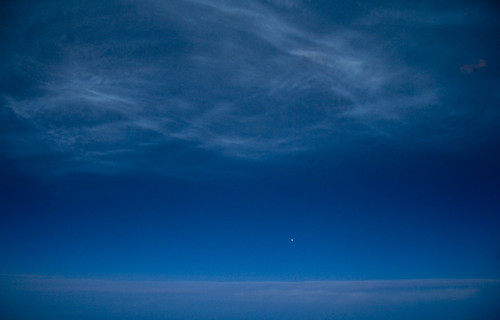
In contrast, this photo is taken with a very very small aperture, meaning that there is a huge distance in relatively good focus:

However, because there was so little light getting through the very small aperture and because I didn't want a grainy image, I had to take a longer exposure to let enough light onto the sensor to give a well exposed image. I rested it on the floor to stabilise the camera. I'll come onto the shutter speed in the next section.
The measure of aperture is f-stop, and there is a great deal to understand about how much you will change the light entering the camera when you change the f-stop by a certain amount, and how you need to change the ISO or the timing to counter this, but I would recommend not worrying about this too much at first, but simply playing around. What is important to know is that a large aperture is given by a small f-stop. The man in Lijiang above was taken at f/1.4, whereas the reflection in the museum was taken at f/29. For a normal landscape I would usually use something like an f/9 or thereabouts, all things being equal, but it depends on the lighting conditions and how much I want in the good focus. In fact the crispness of an image will also be affected by the f-stop because each lens really has an ideal aperture for the sharpest image possible.
Summary:
- Large aperture = small f-stop (f/n where n is small) gives you a shallow depth of field but lets in more light
- Small aperture = large f-stop (f/n where n is large) gives you a deeper depth of field and lets in less light
Shutter Speed
This is pretty clear. The slower the shutter speed the more light you will have hitting your sensor, and the more motion you can capture. Depending on whether you want to freeze a moment or capture the blur of motion you will want to alter the shutter speed to a slower or faster setting.
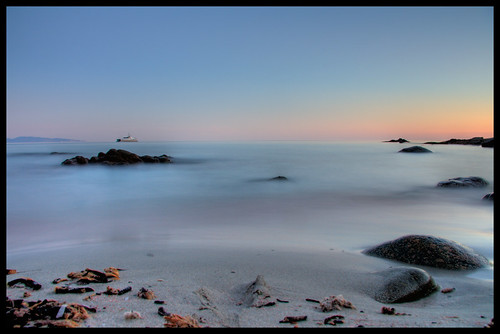
The following is a ten second exposure of the sea in Corsica. The long exposure gives a silky look to the water:
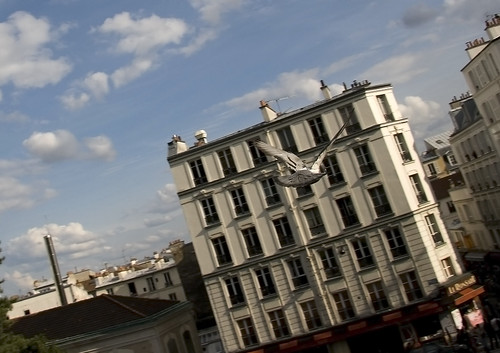
This lucky shot was taken at 1/400th of a second (actually I took it over my shoulder as the pigeon flew past):
Stable images:
One thing to watch out for is that even with image stabilisation (and depending on the magnification of your zoom) you are unlikely to be able to hand hold a shot for more than about 0.2-0.3 seconds without it being shakey. Any more than this and you will need a tripod or something to balance the camera on. At large zoom, the time you can hand-hold will drop significantly. For 300mm even a 1/100th second shot will come out blurred if I'm not very very careful.
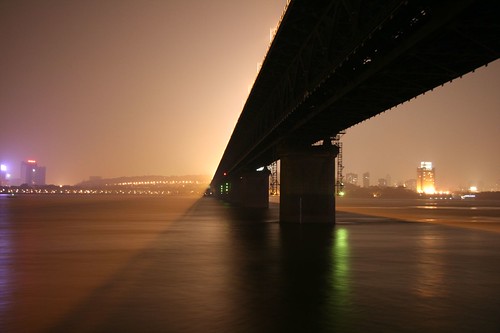
In many situations a tripod is essential for getting the shot. This ten second shot of the first bridge over the Yangtze river in Wuhan for instance. This was taken at ISO 400 which means that there's a bit of graininess. If I had lowered the ISO however I would have needed to increase the time of the shot and because my tripod isn't great, you would probably have been able to see the wobble. It's a compromise.
The balancing act
The art then is to be able to get the three variables right so that you have:
- The depth of focus that you want (do you want all the picture or just a little in focus)
- The timing you want (do you want to stop the motion, or capture the blur)
- With the correct exposure (you usually want to be able to get the lighting which picks out the detail that you want without saturating anything).
At the beginning of this post I mentioned the settings Manual, AV and TV. Manual means that you control both the aperture and the timing. You have full control over the exposure. Generally in your viewfinder you will have a marker which tells you whether your image will be correctly exposed. The light meter is looking at the image and telling you whether, in a certain area of the frame, there is too much or too little light.
In AV and TV you set the aperture and timing respectively. Use these when all that is important to you is to get either the correct depth of focus or the correct speed of shot respectively and you are not worried about the other variable. You can generally tell the camera how you would like the photo exposed and it will calculate for you the correct value for the conjugate variable to get the desired exposure.
Anyway, anyone who has played around with their settings for a while will probably know all the above and more, but I've met many people who have lovely DSLR cameras and haven't had a chance to work out how to control the settings for the best shots in each situation. I hope that this will be a useful guide and will show you that there's nothing scary with the controls which you have at your fingertips.
If you've read this I would appreciate the following:
- If there was something which was particularly unclear then please tell me and I'll do my best to elucidate.
- If it wasn't useful at all, then don't be afraid to tell me (unless it just wasn't useful because you already knew it).
- If I've made any mistakes then do pipe up.
- If you've read through it and it has been useful then please give a link to any photos that you've been particularly pleased with.
- If you have any extra bits that you'd like me to explain then tell me and I'll do my best.
- Have fun with your cameras!
No comments:
Post a Comment